
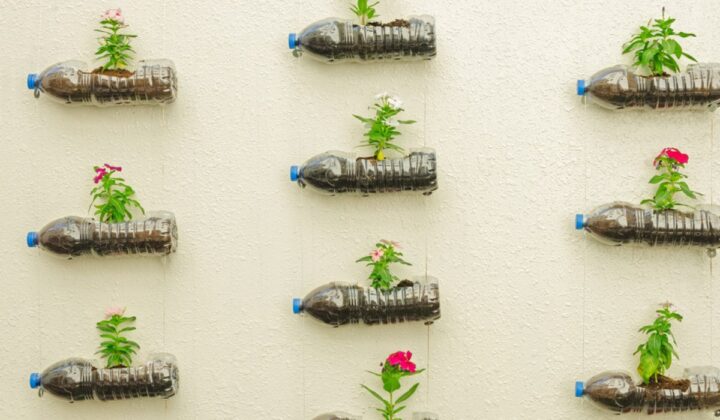
Plastic waste is everywhere and causing harm to our environment. It’s our responsibility to make this planet greener. So, here is simple yet great option to upcycle plastic containers or bottles as planters. All you need to do is put a little effort into making something useful.
This plastic bottle recycling idea counts as double eco-friendly – reduce your carbon footprint and to make the world a greener place. Turn those used water bottles into a portable planter. Use them to house an herb garden, tomato starts, or a houseplant. They’re a great size for seedlings, making it easy to transfer the start to a larger planter later on.
Such a wonderful way to have a small garden in your homes and kitchens, even if you are limited for space.
 Steps to Reuse plastic soda bottles
- Cut the bottle with the help of scissors from the middle, making it half.
- Both sides can be used as a planter.
- Make tiny holes in the bottom with the help of scissors for the drainage system.
- Color it using a paintbrush. Let it dry. Plastic tape can also be used for decoration.
- Add pebbles (optional).
- Add the potting mix to the planter. Or if using soil make sure to add organic fertilizer, composts, and vegetable peels or banana peels.
- Sow the seed or plant the sapling in the planter.
- Make sure to water it as per the requirements.
- Find a place for the planter or hang it on the wall.
What type of plants to grow in plastic bottle planters?
- Herbs can be easily planted in plastic planters. Hang the planters in the kitchen window or as per your choice.
- Make a vertical garden with green vegetables.
- To make the house more colorful, plant flowers and hang them, or can attach the planters to the wall.
- Succulents look beautiful in these small little plastic planters. Place the planters in your study or work table to give aesthetic vibes.
- Another way is to cut the bottle in half, take the bottom part and make tiny holes in the bottom. Sow the seeds and cover them with the top portion of the bottle. Let the seeds sprout. Then transplant them into large plastic container planters.
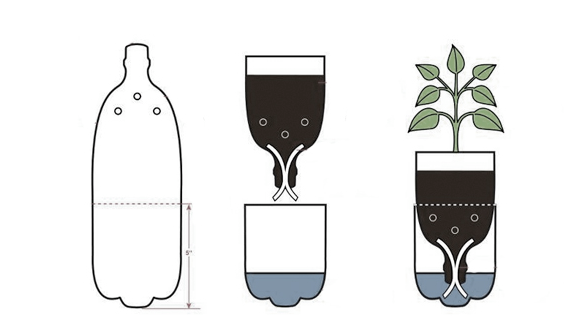
Self Watering Plastic Bottle Planters
A great way to begin an herb garden or a simple way to brighten up a windowsill, these plastic bottle planters are simple, quick, and easy. This planter is also self-watering, perfect for a someone who is always on the go.

To begin, you will need:
- a 2-liter bottle (smaller will accommodate smaller plants)
- a good pair of scissors
- a plant or seeds of your choice, such as herbs or succulents
- soil to match your plant of choice
- cotton yarn or strip from old tshirt
- an awl or other device to make holes in the bottle cap
How to make your self watering planter
- To begin this DIY project, first wash the bottle or bottles you have chosen, making sure everything is clean and free of any labels.
- Second, carefully cut each bottle in half, as both portions will be utilized.
- Next, poke, drill, or cut a few small holes in the bottle cap to allow for water and the cotton yarn to pass through.
- To create the self watering portion, take 3 pieces of cotton yarn at about 6 inches each, and feed each piece through the holes created in your bottle cap. Tie a knot outside the bottle cap to keep it in place.
- Plant your succulent, herb, or seeds in the inverted top portion of the bottle, making sure to distribute the 3 strings throughout the soil to promote even watering.
- Fill the bottom portion of the bottle with 1 to 2 inches of water, just enough for the knot to dip into the water but not enough that the entire cap is submerged.
- Place the inverted top portion with your new plant in the bottom portion filled with water.
That’s it! In a matter of minutes, you’ve created an earth-conscious way to spruce up your living space.


